Written By Admin on Thursday, May 9, 2013 | 11:28 AM
Before you begin:
Rooting the phone will void its warranty. So you may have to install the stock firmware to get back your warranty.
Make a backup of all the important data in your phone including contacts, messages and important applications.
Make sure that your phone has more than 50% of battery.
Install all the required Samsung USB drivers required to connect your mobile with PC. I would suggest you to install KIES 2.0 in your PC which will automatically install all the required drivers.
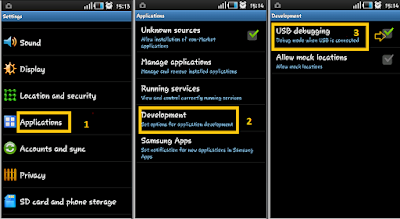
Lastly don’t forget to enable USB debugging option in your phone. For enabling it, go to:
Settings > Applications > Development > USB Debugging
How to Root Samsung Galaxy Pocket S5300:
First of all download the rooting package on your computer and transfer it to your SD card by connecting your phone to computer in USB mass storage mode.
Now switch off your phone and remove the battery. Put the battery back again and restart it back again into recovery mode.
For entering into recovery mode, press the Volume Up button, Menu button (center button) and Power key all together simultaneously.
Once you have booted into recovery mode, choose the option “install zip from SD card” and choose the file that we copied in SD card above. You can use volume key to navigate through the available options.
Confirm the installation by pressing yes and wait until the process completes.
Up next, press back key and choose the “reboot system now” option.
That’s it,you have a rooted the Galaxy Pocket in your hand.
To verify that whether your phone is rooted or not, open the app drawer in your phone and look for “super user app”; if it’s there, your phone is rooted. Just in case, if you don’t find any super user app, you may have to repeat the whole process from the very beginning.
Written By Admin on Wednesday, May 1, 2013 | 3:42 PM
After tinkering with your Cherry Mobile Flare, sooner or later you'll be
needing to root your phone for whatever reason. And whether this is
your first time or nth time to this process, you wanna make sure that it
will not make your phone unusable.
This tutorial in rooting your Cherry Mobile Flare is meant to make the
steps as simple and easy as possible that's why I also included a video
showing you how I rooted my own unit. As always, make sure that you
follow steps carefully and don't rush.
DISCLAIMER:Rooting can brick
your phone and will also void its warranty. DO IT AT YOUR OWN RISK. I'm
not responsible for any possible damage that may happen to your device.
I basically used the same procedures from my previous article on How to Root MyPhone A919 Duo.
How to change boot animation of Cherry Mobile Flare How To Change Boot Logo/Splash Image Of Your Android Phone
Before Rooting:
Download to your computer this Root Tools zip file that contains PdaNet for Windows XP/Vista/7 and Root with Restore by Bin4ry
Unzip the file after download
For Windows 7/8/Vista, after unzipping, right click RunMe
then click on Properties > click the Compatibility tab > check
Compatibility and set it to Windows XP SP3 > Ok
Enable USB debugging on your phone. Go to Settings > Developer Options > USB Debugging.
Don't connect your phone to the computer until you're told to do so.
Rooting your Cherry Mobile Flare:
On your PC, double click on PdaNetZ350 and continue with the installation until you see a pop-up message like the one below.
Select Others then click OK.
A warning message will appear saying that "Windows can't verify the
publisher of this driver software." Click on "Install this driver
software anyway"
PdaNet will now ask you to connect your device to the computer.
Connect your phone to your computer via USB cable. Don't enable any
modes like USB storage, etc.
Let the driver installation complete then finish.
On your PC again, double click on RunMe.
A command prompt window will pop-up. Press 1 and hit the Enter.
NOTE:
If you want to UNROOT your Cherry Mobile Flare, follow step
6 onward until you reach this point but instead of typing 1, type x then
hit enter and follow the instructions after that.
On your phone, tap “Restore my data”, this will reboot your phone, wait for your phone to be fully ready.
On your computer, the command prompt will require you to press any key to continue.
That's it! You've successfully rooted your Cherry Mobile Flare.
Written By Admin on Sunday, March 31, 2013 | 11:07 AM
To enter Stock Recovery or CWM:
turn off your Cellphone
press power + vol up till you see red on your screen
On Installing or Flashing from CWM Note:
all the zip files are on your internal memory of your Flare or the sd/sd_card
(to simplify finding the zip files, make a '0' or an 'A' named folder on your internal memory and put all your zip there)
vol down is scroll down
power is select/confirm
vol up is back (on CWM v5)