Written By Admin on Saturday, February 8, 2014 | 5:02 PM
Look around. See anyone using a smartphone? Is their face contorted into an ugly mask of fury? Have their teeth been ground down so violently you can see their exposed nerve endings rubbing together? Are they muttering swearwords with a ferocity that's coated everything around them in foamy spittle? Do they scream abuse at anything with wings? If the answer to any two of those is yes, there's a pretty good chance they are playing Flappy Bird.
Flappy Bird vs. Angry Bird
Flappy Bird is the No 1 free app in the Google Play app store. Since its launch on the site last week, it has become such a phenomenon that people are already calling it the new Angry Birds. In it, you control a pudgy green bird. Tap the screen once and the bird soars into the air. Leave the screen untapped and it plummets to the ground. The bird lives in a world full of pipes, and you have to guide it through the gaps between them. If the bird misses one gap – just one, no matter how glancingly – it dies, and you have to start again.
My high score is four. I've got the poxy bird through four poxy gaps. I've only played it for a maximum of 20 seconds before the stupid bird cracks its useless skull against the sodding pipe again and I have to start from the beginning. I hate it. I hate Flappy Bird. And all birds now. I don't even know why it needs to go through all those pipes anyway. There's probably nothing at the end of it, anyway. Just more pipes. That bird is an idiot.
It has been suggested that the sudden and unexpected success of Flappy Bird is because its creator, Vietnam-based Dong Nguyen, has somehow spammed the app store with false ratings and accounts from cloaked IP addresses. Nguyen claims that it's merely down to luck. However, from my experience it seems more likely that Flappy Bird has been downloaded so often because it's so incomprehensibly frustrating that you feel compelled to condemn it in public the moment you play it. People have tweeted about how much they hate Flappy Bird:
Written By Admin on Sunday, August 11, 2013 | 12:21 AM
Android is one of the most open, versatile, and customizable mobile operating systems out there. You may think you don't need to root your phone, but you'd be surprised at how much more you can accomplish with a little work. Here are 10 reasons rooting your phone is worth the hassle.
10. Unlock Hidden Features and Install "Incompatible" Apps
Sometimes, even Android isn't open enough to give you some of the features you want. Either an app is blocked by carriers, hacks into Android's system files, or otherwise isn't available. Luckily, rooting can help with that: you can install carrier-blocked apps, get features from the latest version of Android, make incompatible apps compatible, power up your hardware, get features like Beats Audio from other phones, or emulate exclusive features like those on the Moto X. Whatever you want, rooting gives you the power to do a lot more.
9. Automate Everything
You've probably heard of Tasker, the awesome app that automates just about anything on your phone. You don't need to root your phone to use it, but if you're rooted, it can do a whole lot more. Certain tasks, like toggling 3G, GPS, changing CPU speed, turning the screen on, and others require root access. So, if you want to get the full benefit of an app like Tasker, you'll definitely want to root your phone. For more automation inspiration, check out your best Tasker actions, as well as our most recently featured Tasker tricks.
8. Boost Your Phone's Speed and Battery Life
You can do a lot of things to speed up your phone and boost its battery life without rooting, but with root—as always—you have even more power. For example, with an app like SetCPU you can overclock your phone for better performance, or underclock it for better battery life. You can also use an app like Greenify to automatically hibernate apps you aren't using—perfect for those apps that always want to run in the background when you're not looking.
7. Block Ads in Any App
Look, we of all people understand the need for occasional ads—it's how we make money. But ads can also get in the way and use up data. If you want to block ads in certain apps or on certain devices, rooting is by far the best way to do so. AdFree, AdBlock Plus, and Ad Away are all great options. Of course, if you aren't rooted, going into airplane mode works in a pinch too.
6. Back Up Your Phone for Seamless Transitions
When you move to a new Android device—or restore your device to stock for any reason—you can make your life a lot easier by backing up your apps and settings first. That way, you can get your entire setup back in just a few taps. If you aren't rooted, you can back up a few things like apps and data, but you won't necessarily be able to backup system apps and their data, or automate the entire process as well as Titanium Backup can. Check out our guide to Titanium Backup for more tips.
5. Remove Preinstalled Crapware
Titanium Backup is good for more than just backups, too. It can also uninstall that annoying, battery-draining, space-wasting crapware that comes preinstalled on so many phones these days—and, sadly, this feature is root-only. Freeze them first to make sure your phone operates normally without them, then delete them completely to free up that space. You'll be glad you did. Photo by Daniel Sancho.
4. Tweak the Dark Corners of Android
If you're the kind of person that likes to fiddle with every little feature—both on the surface and under the hood—rooting is for you. Whether you want to customize your keyboard layout with something like Keyboard Manager or give yourself faster scrolling, improved multitasking, and extra themes with Pimp My ROM, rooting gives you the power to tweak just about any corner you can think of. If you want to do it, chances are someone over on a forum like XDA has created a mini-app or tweak that will help.
3. Flash a Custom Kernel
Some of Android's most under-the-hood tweaks require a custom kernel, which you can only flash with a rooted device. The kernel is responsible for helping your apps communicate with the hardware of your phone, which means a custom kernel can give you better performance, battery life, and even extra features like Wi-Fi tethering (on unsupported phones), faster battery charging, and lots more. You can flash kernels manually or simplify the process with something like Kernel Manager.
2. Flash a Custom ROM
Okay, so you probably already know about this one—but it's one of the best benefits of rooting. A custom ROM is basically a custom version of Android, and it truly changes how you use your phone. Some merely bring a stock version of Android to non-stock phones, or later versions of Android to phones that don't have it yet. Some add a few handy features, some add lots of really unique features, and some change your operating system from head to toe. No matter what phone you have—even if it's a Nexus—we highly recommend checking out the custom ROMs out there. You won't be disappointed. Note: As some of you have noted, you don't actually need root access to flash a custom ROM—though you will need to unlock your bootloader (a process that sometimes comes bundled with root access). Still, it requires freeing your device from manufacturer lockdowns, so we've kept it in the list despite this technicality!
1. Truly Own Your Device
In the end, all of this boils down to one thing: you own your device, and you should be able to do with it as you please. Certain manufacturers and carriers try to keep that from happening, but with root access, you truly own your device and open yourself up to all the possibilities other parties try to block. Sure, there's some risk involved, and we don't usually recommend rooting other people's phones, but in the end, you can't put a price on true openness and control.
Written By Admin on Saturday, June 15, 2013 | 6:14 PM
Pinoy mobile company, Torque, just released a couple of new dual-SIM Android phones for the budget-conscious out there.
What’s new in their Droidz series is the dual-SIM Sport and Force. Both really don’t have current-generation specs but it comes with Torque’s new Droidz Flex Technology, a software optimization that will maximize the hardware capability of the device so you can do more with less.
The Droidz Sport features a 3.5” HVGA 320×480 capacitive display with a 165ppi pixel density. It uses a 1GHz single-core Spreadtrum SC6820 processor with a Mali-400 GPU. RAM is limited at 256MB and internal storage is at 512MB with support for microSD. With those specs, this device runs only on Android 2.3.6 (Gingerbread) OS.
Torque Droidz Sport
It also sports a 2-megapizel fixed-focus camera (no front-facing camera), 3.5mm stereo headset, FM radio and multimedia player, Micro-USB port, motion sensor and a 1500mAh Li-Ion battery. This dual-SIM budget phone retails for just Php2,599.
The Droidz Force on the other hand, is more or less a bigger version of the Sport with its 4-inch WVGA display, that’s 800 x 480 resolution for a 233 ppi pixel density. It also uses the same 1GHz single-core Spreadtrum SC6820 processor, with 512MB RAM and 512MB internal storage plus microSD support. Rest of the specs are similar: Android 2.3.6 Gingerbread, 2-megapixel fixed focus front camera, VGA rear camera, FM Radio, and a 1500mAh Li-Ion battery.
Torque Droidz Force
The Droidz Force is basically an entry-level 4-inch dual-SIM phone that retails for just Php2,999.
Written By Admin on Friday, May 24, 2013 | 8:15 AM
As bumpy and controversial the ride may have been, the HTC One, a make-or-break smartphone for the Taiwan-based phone maker, has nonetheless reached Philippine shores. Officially (official), that is, following a not-just-for-media unveiling at one of Bonifacio Global City's swankiest addresses.
HTC's breadwinner is obviously no stranger to Android enthusiasts, largely because of its Apple-inspired, machined-aluminum housing. Of course, it helps that the One is widely regarded as the most beautiful and finely crafted unibody Android handset.
Its insides are downright desirable, too, boasting a Qualcomm Snapdragon 600 chipset armed with a 1.7GHz quad-core processor; Adreno 320 graphics; and 2GB of RAM. At 32GB, internal storage should be plenty. However, take note that the HTC One does not carry microSD expansion.
HTC One
The screen measures 4.7 inches diagonally and uses an improved iteration of IPS-LCD technology. As is customary for signature phones, it is smothered by a sheet of scratch-resistant cover glass. Better still, it boasts 1080p resolution, resulting in the most pixel-dense panel (469ppi) we've laid eyes on.
Also on tap are the following: Android Jelly Bean, albeit hardly recognizable courtesy of HTC's Sense UI; 4- and 2.1-megapixel rear and front cameras; WiFi, 3G, Bluetooth, and NFC modules; and Beats-enhanced front-facing integrated speakers.
The phone is powered by a 2,300mAh lithium-polymer battery, so it likely has enough juice to get you through a full day with normal usage.
The high-end HTC One will fetch an equally premium price of P32,990—P2,000 more than its fiercest Android flagship rival, Samsung's Galaxy S4, might we add—and is slated to go on sale on May 24.
HTC One specs:
LTE
Qualcomm APQ8064T Snapdragon 600 chipset
Quad-core 1.7 GHz Krait 300 CPU
Adreno 320 GPU
2GB RAM
32/64GB internal storage
No memory-card slot
4.7-inch Super LCD3 capacitive touchscreen with 1080 x 1920 pixels, 469ppi pixel density, and Corning Gorilla Glass 2
4-megapixel ("ultrapixel" in marketing speak) main camera with auto-focus and LED flash
2.1-megapixel secondary camera that can shoot HD videos at 30fps, has HDR
The model is the fourth Cherry Mobile device with a quad-core processor after the Fusion Bolt, Flame 2.0, and Fusion Fire. It is now powered by Qualcomm’s Snapdragon S4 chipset, replacing MediaTek’s MT6577 in its predecessor.
Cherry Mobile SkyFire 2.0 will be available at all Cherry Mobile concept stores, kiosks, and accredited dealers nationwide for P7,999.
Written By Admin on Thursday, May 9, 2013 | 11:28 AM
Before you begin:
Rooting the phone will void its warranty. So you may have to install the stock firmware to get back your warranty.
Make a backup of all the important data in your phone including contacts, messages and important applications.
Make sure that your phone has more than 50% of battery.
Install all the required Samsung USB drivers required to connect your mobile with PC. I would suggest you to install KIES 2.0 in your PC which will automatically install all the required drivers.
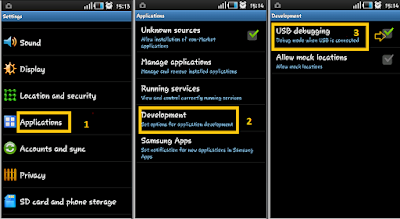
Lastly don’t forget to enable USB debugging option in your phone. For enabling it, go to:
Settings > Applications > Development > USB Debugging
How to Root Samsung Galaxy Pocket S5300:
First of all download the rooting package on your computer and transfer it to your SD card by connecting your phone to computer in USB mass storage mode.
Now switch off your phone and remove the battery. Put the battery back again and restart it back again into recovery mode.
For entering into recovery mode, press the Volume Up button, Menu button (center button) and Power key all together simultaneously.
Once you have booted into recovery mode, choose the option “install zip from SD card” and choose the file that we copied in SD card above. You can use volume key to navigate through the available options.
Confirm the installation by pressing yes and wait until the process completes.
Up next, press back key and choose the “reboot system now” option.
That’s it,you have a rooted the Galaxy Pocket in your hand.
To verify that whether your phone is rooted or not, open the app drawer in your phone and look for “super user app”; if it’s there, your phone is rooted. Just in case, if you don’t find any super user app, you may have to repeat the whole process from the very beginning.
Written By Admin on Wednesday, May 1, 2013 | 3:42 PM
After tinkering with your Cherry Mobile Flare, sooner or later you'll be
needing to root your phone for whatever reason. And whether this is
your first time or nth time to this process, you wanna make sure that it
will not make your phone unusable.
This tutorial in rooting your Cherry Mobile Flare is meant to make the
steps as simple and easy as possible that's why I also included a video
showing you how I rooted my own unit. As always, make sure that you
follow steps carefully and don't rush.
DISCLAIMER:Rooting can brick
your phone and will also void its warranty. DO IT AT YOUR OWN RISK. I'm
not responsible for any possible damage that may happen to your device.
I basically used the same procedures from my previous article on How to Root MyPhone A919 Duo.
How to change boot animation of Cherry Mobile Flare How To Change Boot Logo/Splash Image Of Your Android Phone
Before Rooting:
Download to your computer this Root Tools zip file that contains PdaNet for Windows XP/Vista/7 and Root with Restore by Bin4ry
Unzip the file after download
For Windows 7/8/Vista, after unzipping, right click RunMe
then click on Properties > click the Compatibility tab > check
Compatibility and set it to Windows XP SP3 > Ok
Enable USB debugging on your phone. Go to Settings > Developer Options > USB Debugging.
Don't connect your phone to the computer until you're told to do so.
Rooting your Cherry Mobile Flare:
On your PC, double click on PdaNetZ350 and continue with the installation until you see a pop-up message like the one below.
Select Others then click OK.
A warning message will appear saying that "Windows can't verify the
publisher of this driver software." Click on "Install this driver
software anyway"
PdaNet will now ask you to connect your device to the computer.
Connect your phone to your computer via USB cable. Don't enable any
modes like USB storage, etc.
Let the driver installation complete then finish.
On your PC again, double click on RunMe.
A command prompt window will pop-up. Press 1 and hit the Enter.
NOTE:
If you want to UNROOT your Cherry Mobile Flare, follow step
6 onward until you reach this point but instead of typing 1, type x then
hit enter and follow the instructions after that.
On your phone, tap “Restore my data”, this will reboot your phone, wait for your phone to be fully ready.
On your computer, the command prompt will require you to press any key to continue.
That's it! You've successfully rooted your Cherry Mobile Flare.
Written By Admin on Sunday, March 31, 2013 | 11:07 AM
To enter Stock Recovery or CWM:
turn off your Cellphone
press power + vol up till you see red on your screen
On Installing or Flashing from CWM Note:
all the zip files are on your internal memory of your Flare or the sd/sd_card
(to simplify finding the zip files, make a '0' or an 'A' named folder on your internal memory and put all your zip there)
vol down is scroll down
power is select/confirm
vol up is back (on CWM v5)
Written By Admin on Saturday, March 30, 2013 | 5:42 PM
Adobe® Photoshop® Touch 1.4.1 android app has now been available with the new version. Adobe® Photoshop® Touch 1.4.1 is the latest version of the app with some developments and improvements. You will absolutely be amazed with the new features of this latest version of the android apps apk. Many more advantages you can get from this latest Android app.
New Features of the Adobe® Photoshop® Touch 1.4.1
As it has been said before, Adobe® Photoshop® Touch 1.4.1 has some new features and some improvements in the older features of this app. Many developments are added to this new version of Android app. The developer aims the similar features from the previous version yet with more sophisticated features.
Transform your images with core Adobe Photoshop features in an app designed for tablets.
Combine images, apply professional effects, share results with friends and family through Facebook and Twitter – all from the convenience of your tablet.
• Use popular Photoshop features designed for the tablet such as layers, selection tools, adjustments, and filters to create mind-blowing images.
• Use your tablet camera to fill an area on a layer with the unique camera fill feature.
• Select part of an image to extract by scribbling with the Scribble Selection tool. With Refine Edge, use your fingertip to capture even hard-to-select image elements, like hair, with ease.
• Work on high-resolution images while maintaining the highest image quality. Supports images up to 12 megapixels.
• Follow step-by-step tutorials to easily learn techniques the pros use for great-looking results.
• Search and acquire images with the integrated Google Image Search.
• Browse an inspirational gallery for the styles and results you'd like to achieve.
• Automatically sync projects to Adobe Creative Cloud* and open layered files from Adobe Photoshop Touch in Photoshop CS6 or Photoshop CS5.1.
• Free membership to Creative Cloud gives you 2GB of cloud storage plus the ability to sync between tablet and desktop, access files from the web, and easily share with others. Learn more > http://www.adobe.com/products/creativecloud
By clicking the Install button, you acknowledge that you have read and agree to the Adobe Software License Agreement at http://www.adobe.com/go/eulas.
* Internet connection and membership to Adobe Creative Cloud is required. Adobe online services, including the Adobe Creative Cloud* service, are available only to users 13 and older and require registration, agreement to additional terms and Adobe's online privacy policy athttp://www.adobe.com/privacy/policy.html.
Adobe online services are not available in all countries or languages, may require user registration and may be subject to change or discontinuation without notice.
Pricing in the European Union, Norway and Switzerland includes tax.
For you who have the previous version of the Adobe® Photoshop® Touch 1.4.1, you will be very recommending to download this app. You will get more sophisticated features of the previous version and you will get some new features that support the previous features.
a) HARDWARE ACCELERATION – Hardware acceleration can be applied to more videos with the help of new H/W decoder.
b) MULTI-CORE DECODING – MX Player is the first Android video player which supports multi-core decoding. Test result proved that dual-core device’s performance is better up to 70% than that of single-core devices.
c) PINCH TO ZOOM – Easily zoom in and out by pinching and swiping across the screen.
d) SUBTITLE SCROLL – Subtitles can be scrolled to move back and forth faster.
e) KIDS LOCK – Keep your kids entertained without having to worry about them making calls or touching other apps. (plugin required)
Written By Admin on Wednesday, March 27, 2013 | 6:56 PM
Samsung's Galaxy S3 was one of the most popular smartphones of 2012 but how does it compare to its replacement, the Galaxy S4? We take a look at how the new flagship handset compares to its predecessor in our Samsung Galaxy S4 vs Galaxy S3 comparison review. Updated on 26/03/2013.
Hype and anticipation surrounding the Galaxy S4 was monumental and now it's finally here. If you're a Galaxy S3 owner you're probably wondering whether it's worth upgrading or your trying to decide whether to save money by opting for the now well out of date Galaxy S3 instead of the Galaxy S4. Well this comparison will help you decide. See also: Best smartphones of 2012
We haven't seen the Galaxy S4 in the flesh yet so this article is based on the Galaxy S4 spec sheet compared with Galaxy S3's, plus our opinion of course.
Take a look at the following two articles for more details on each handset.
Samsung Galaxy S3 review
Samsung Galaxy S4: details, what you need to know
Samsung Galaxy S4 vs Galaxy S3: Design
As you can see from the image above, the Galaxy S4 looks extremely similar to the Galaxy S3 in design. Put simply, it's just a bigger version. It keeps the rounded corners but has a slightly squarer look to it like the Galaxy S2. The rear removable cover also remains, as does the physical home button which is a slightly different shape.
See also: Group test: What's the best smartphone?
According to Samsung's specifications the Galaxy S4 is marginally smaller than the Galaxy S3 despite it's larger screen. The two are the same height at 136.6mm but the Galaxy S4 is 69.8mm wide compared to 70.6mm. It's also thinner and lighter than its predecessor at 7.9mm and 130g against 8.6mm and 133g. Impressive work from Samsung if these figures are correct.
Samsung Galaxy S4 vs Galaxy S3: Design
As you can see from the image above, the Galaxy S4 looks extremely similar to the Galaxy S3 in design. Put simply, it's just a bigger version. It keeps the rounded corners but has a slightly squarer look to it like the Galaxy S2. The rear removable cover also remains, as does the physical home button which is a slightly different shape.
According to Samsung's specifications the Galaxy S4 is marginally smaller than the Galaxy S3 despite it's larger screen. The two are the same height at 136.6mm but the Galaxy S4 is 69.8mm wide compared to 70.6mm. It's also thinner and lighter than its predecessor at 7.9mm and 130g against 8.6mm and 133g. Impressive work from Samsung if these figures are correct.
Samsung Galaxy S4 vs Galaxy S3: Screen
As rumours suggested, the Galaxy S4 has a 5in screen, meaning it will be slightly larger than the Galaxy S3's 4.8-inch display. Both use Samsung's favoured SuperAMOLED technology.
The size matches up with a lot of the smartphones announced at CES this year, including the Sony Xperia Z, Huawei Ascend D2 and ZTE Grand S.
It's resolution has increased from 720x1280 up to a Full HD 1080x1920. This ups the pixel density significantly from 306ppi to 441ppi.
Samsung Galaxy S4 vs Galaxy S3: Processor
Samsung used its own Exynos 4 Quad processor for the Galaxy S3, a quad-core chip unsurprisingly. It's clocked at 1.4GHz and is based on the ARM Cortex-A9 architecture.
The Galaxy S4 outdoes this with the Exynos 5 Octa processor which Samsung announced at CES. It's the first smartphone to boast an 8-core chip. It consists of four Cortex-A15 cores clocked at 1.6GHz for performance while the remaining four are Cortex-A7s clocked at 1.2GHz for less demanding tasks and power saving.
The RAM has also been doubled from 1GB to 2GB so we're expecting the Galaxy S4 to ace our benchmarks.
Update:
Samsung has confirmed that the UK model of the Galaxy S4 will use a 1.9GHz quad-core processor instead of the octa-core chip.
Samsung Galaxy S4 vs Galaxy S3: Storage
Samsung was generous with the storage options on the Galaxy S3 matching the iPhone with 16GB, 32GB and 64GB models plus a microSD card slot. The situation is unchanged when it comes to the Galaxy S4 so there's nothing to worry about here.
Samsung Galaxy S4 vs Galaxy S3: Cameras
The Galaxy S3's 8Mp camera was a fairly standard resolution for 2012 with the exception of only a few handsets. The Samsung Galaxy S4 got its tipped 13Mp rear facing camera and a 2.1Mp front facing camera. It's marginally higher than the Galaxy S3's 1.9Mp but importantly can record video in Full HD 1080p rather than 720p.
We can't say whether the image quality is better yet but the upgrade seems pretty good.
Samsung Galaxy S4 vs Galaxy S3: Software
Now running Android 4.1.2 Jelly Bean, the Samsung Galaxy S3 is almost up-to-date in the world of Android. The Galaxy S4 will ship with version 4.2.2 which is no significant difference and both have Samsung's TouchWiz interface.
The Galaxy S4 does have new features including Smart Scroll, Smart Pause and Air Gesture to name three. We're hearing that the Galaxy S3 will be updated with some of the new features but it's not clear which will and which won't make the move.
Samsung Galaxy S4 vs Galaxy S3: Battery
We expected the Galaxy S4's battery to be larger than the Galaxy S3's 2100mAh battery - and it is, at 2600mAh (both are removable). Whether battery life will be longer will only become apparent when we give it a proper test. It's a hard one to call since the screen is larger and has a higher res, but the Exynos 5 processor has power saving cores which could make a big difference.


.jpg "Adobe® Photoshop® Touch")


